Rubberduck – refactoring in VBA

Hi all, recently came across an interesting Rubberduck project. Did you think that VBA is dead and buried? It looks like it’s not going down that easily!

Rubberduck is a COM Add-In for the VBA IDE that makes VBA development even more enjoyable, by extending the Visual Basic Editor (VBE) with menus, toolbars and toolwindows that enable things we didn’t even think were possible when we first started this project.

If you’re learning VBA, Rubberduck can help you avoid a few common beginner mistakes, and can probably show you a trick or two – even if you’re only ever writing macros. If you’re a more advanced programmer, you will appreciate the richness of Rubberduck’s feature set.

Continue reading“Rubberduck – refactoring in VBA”

Moving control point along path in Visio

Hello all, Here is a technique you can use to make control point stick to a connector path. I\’ve learned it recently from these two topics (one, two). I found it interesting:

test

To achieve this sort behavior (although not necessarily with hearts, but just plain text) you can use some Visio ShapeSheet functions, which might be not of everyday use: POINTALONGPATH, allows you to figure out current position on the path from the start, NEARESTPOINTONPATH, allows you to find a nearest point to the path from a given point, ANGLEALONGPATH, allows you to find the current angle See more about these here

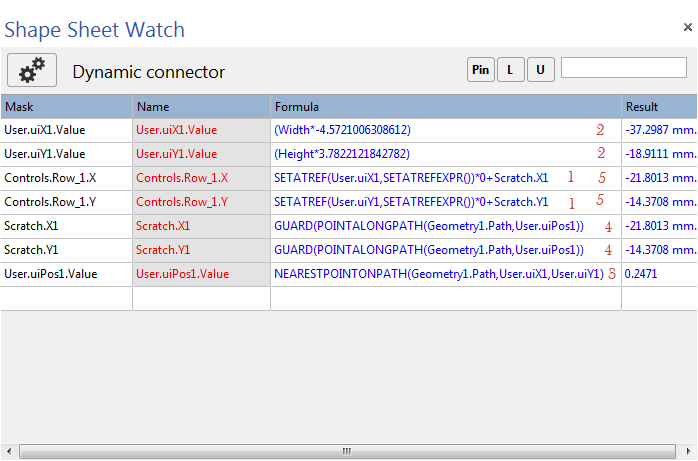
To keep the control points on path, a technique is used based on SETATREF(SETATREFEXPR()) to transfer user value of control point to user cells which are then transferred to the Scratch section to split X/Y and then back to the control point:
2-20-2015

See the attached Visio file for the full sample, and more information about SETATREF/SETATREFEXPR here. And, yea, happy Valentine\’s day whoever celebrated it 🙂

point-along-path.vsd_.zip (13.6 KiB)

Update to Visio Addin project templates

Visio project templates updated to version 1.0.2:

– Now Visual Basic projects are also supported
– now the platform of the installed Visio is selected by default, and Visio is selected as executable to debug by default
– Added default UI to the installer
– Fixed issue with some configurations (error on project creation if some specific combination of checkboxes is selected)

More information here

Project templates: Visio Panel Addin

Hello all,

Have recently published a bunch of templates to create Visio Add-ins in Visual Studio. Templates for creating Visio COM addnins & VSTO addins. The template includes:

– Installer project
– User interface to start with
– A TaskPane (not really a “TaskPane”, but a docking panel), and a toggle button to control it
– Custom images for the buttons.
– State (enabled/disabled) for the buttons.
– Optional support for legacy Visio version (2003/2007; command bar with buttons)

More information

Configuring SharePoint library to store Visio documents

This post explains how one can set up a standard SharePoint document library to store Visio drawings, with option to create new drawings from a custom template (i.e. to allow your custom templates under “New” button in SharePoint). I’ve spent some time figuring this out for myself.. 🙂 Can be useful when:

1) You have a SharePoint (or Office 365 with SharePoint site, doesn’t really matter). Note that you don’t necessarily need Visio Process Repository (and thus SharePoint Enterprise). You can use normal document library as well (it will also work, just not all functionality will be available).

2) You want to provide some Visio template to your users (or for yourself) so it is possible for them to create new diagrams using that template directly from the site. For example, if you work in some organization, and want your users to use a specific template to draw diagrams.

In this post, I have added a Visio "Template X" as an example (containing "Stencil X"). Note that template and stencil should be stored in the same folder in SharePoint so that Visio can find the stencil when it creates new diagram out of the template.

Here is a step-by-step video:

http://www.youtube.com/watch?v=5a93U6DvEc4

To get things running the following steps are to be done:

  1. Create a template and a stencil.
  2. Upload template and stencil to some document library on the site (e.g. SiteAssets)
  3. Add new document content type on the site for our template
  4. Allow this content type for the document library where you want to store you Visio drawings.

    1. Creating a Visio template and stencils.

    I think this part is pretty much covered in Visio documentation. Note that you can just use existing Visio template/stencil, in this article I create new ones for demo purposes basically, to show how to make it all from scratch.

    2. Uploading to SharePoint site.

    Uploading should not be a problem, you just select a target library and save stencil and template to that library. I opted to use “SiteAssets” as it exists by default and contains files related to the site. Note that in SharePoint library settings you have an option to “edit template” – this was designed to work with Word/Excel and may not work as expected for Visio, if you have a custom stencil. So if you have both custom template and stencil, I would recommend to put them next to each other in one library.

image

3. Adding new content type

3.1 Go to Site Settings => Site Content Types => Create
3.2. Enter data form the new content type:

  • Name => "Template X",
  • Parent content type => "Document content type / Document",
  • Group => Anything, you can create a new group e.g. "Visio Templates"

image

4. Enabling this content type in the document library:

4.1 Go to Library => Library Settings
4.2 Ensure that “Content type management” is enabled under “Advanced” (option should be checked).
4.3 Click Content types => Add from existing site content types
4.4 Select “Template X” created at the previous step, click “Add”, “OK”. You should get this content type listed now under “Content types”.
4.5 Click the “Template X” now (we will assign template for it now).
4.6 Click “Advanced settings”, and the in the field “Document template” enter the path to the template in the “SiteAssets” document library, like “/SiteAssets/TemplateX.vst”, Click OK.
4.7 Now new option should appear under “New” menu, listing our new template.

That’s it. Now the template should be under "New" menu, and everybody who has access to the library should be able to create new diagram using that template (and stencil).

New Visio book by David J Parker

Davd J. Parker’s new Visio 2013 book was recently released by PACKT Publishing:

Microsoft Visio 2013  Business Process Diagramming and Validation

I personally participated in the review process of this book (as a technical reviewer), and I would like to recommend the book for all Visio users and developers, who model processes with Visio, or develop their own solutions using Microsoft Visio. The book includes a lot of useful information on Visio diagram validation (check out the Rules Tool), Visio solution publishing (in particular, e.g. SharePoint 365 integration), Visio add-in development using .NET and WPF technologies, and many other interesting topics!

If you are a Microsoft Visio 2013 Professional Edition user or developer who wants to get to grips with both the basic features of Visio 2013 and the new Validation Rules in this edition, then this book is for you. A working knowledge of Microsoft Visio, and optionally .NET for the add-in code, is required, though previous knowledge of business process diagramming is not necessary. More experienced Visio users will gain valuable knowledge for building add-ins and creating and publishing rules. If you want to achieve results from Visio 2013 beyond the ordinary out-of-the-box features, then this book is ideal for you. Although this book covers the Professional Edition, much of the book is still useful if you are a Visio 2013 Standard Edition user.

Table of contents

Chapter 1. Overview of Process Management in Microsoft Visio 2013
Chapter 2. Understanding the Microsoft Visio Object Model
Chapter 3. Understanding the ShapeSheet™
Chapter 4. Understanding the Validation API
Chapter 5. Developing a Validation API Interface
Chapter 6. Reviewing Validation Rules and Issues
Chapter 7. Creating Validation Rules
Chapter 8. Publishing Validation Rules and Diagrams
Chapter 9. A Worked Example for Data Flow Model Diagrams – Part 1
Chapter 10. A Worked Example for Data Flow Model Diagrams – Part 2
Chapter 11. A Worked Example for Data Flow Model Diagrams – Part 3
Chapter 12. Integrating Validated Diagrams with SharePoint 2013 and Office365
Index

ShapeSheet Watch – now with multiselect

Here is the updated version (1.0.6). See basic info in the previous post, where the tool was introduced.

FileDescriptionSizeDate
ShapeSheetWatch_2013_11_x64.msi ShapeSheetWatch (x64)3.0 MiB01.12.2013
ShapeSheetWatch_2013_11_x86.msi ShapeSheetWatch X862.1 MiB01.12.2013

Added:

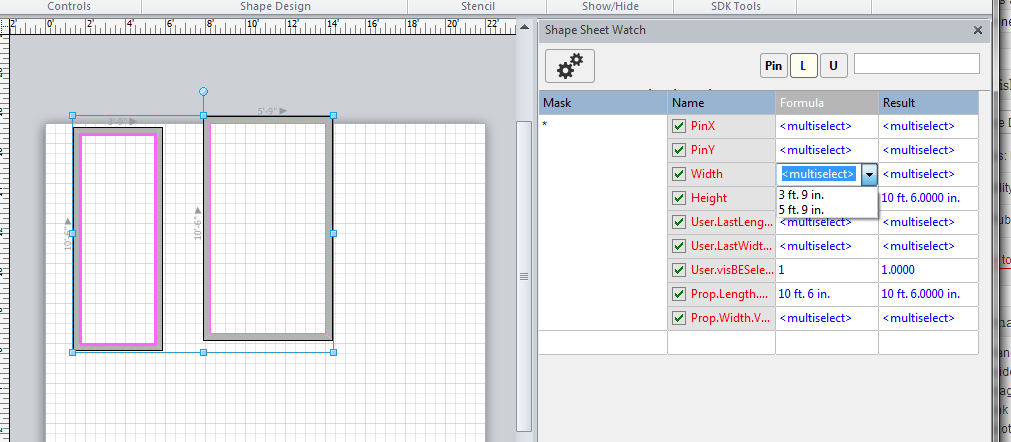
Now supports multi-select.

You can select several shapes, and change a ShapeSheet cell for all of them at once, so you don’t need to edit it for each shape individuality.

12-1-2013 2-31-35 AM

Highlight of changed values.

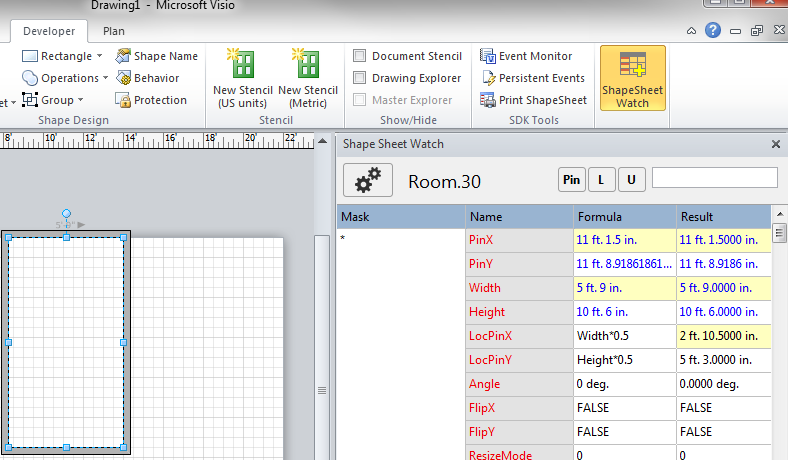
The values which were changed since last updated are now highlighted. This allows easy visualization of changed values, thus allowing you to understand what effect has a change of one cell to others, or what cells differ between different shapes.

12-1-2013 2-19-22 AM

Filters

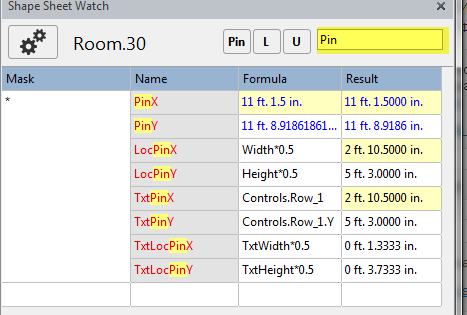
Full text search.

You can search for text in a ShapeSheet cell, or for a cell itself, this will allow you to get to the cell/value you are looking for much faster:

12-1-2013 2-22-58 AM

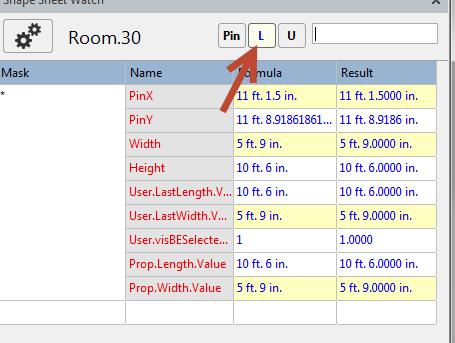
Show only local values

Allows you to filter only values which were defined in shape, and not in the template. These values are normally shown BLUE in the built-in ShapeSheet, and most probably these need to be edited more often.

12-1-2013 2-25-15 AM

Show only highlighted cells

Well, it does exactly that – shows only changed cells. The button is next to the first one =)

Fix shape (PIN)

Allows to turn OFF “following” the shape on selection. if shape sheet is not “Pinned” (default) , then the window shows the data of the selection. If you click now the “Pin” button then window will be bound to the current selection, and will not follow the subsequent changes of selection. By fixing selection of a shape, you can monitor it’s changes when you change different shapes.