If you develop add-ins, templates, or stencils for Visio, sooner or later you will face the question of how to deploy them. Visio allows you to deploy your solution or template in such a way that it can be embedded nicely in the Visio user interface, appearing like all other built-in Visio templates. For Visio developers, Visio SDK provides the Solution Publishing Tool, which is an official method to publish Visio-related components. However, this tool has several limitations, including:
- It does not integrate well into automated build processes, such as when using continuous integration with a build server.
- It uses custom VBScript actions, which may become a problem with some antivirus programs or in very restricted environments.
Windows Installer XML (WiX) builds Windows installation packages from XML source code and integrates seamlessly into build processes. The toolset originates from Microsoft, which used it internally to build Microsoft Office installers. The tool is highly robust!

This post explains the magic behind the Visio Solution Publishing tool and demonstrates how you can achieve the same result with WiX. It shows how to create an installer to install templates and stencils and includes a sample/template WiX solution to install Visio files for both Visio x86 and Visio x64.
Creating an installer involves the following steps:
- Download and install WiX (version 3.6 was used for the sample project).
- Create a WiX project in Visual Studio.
- Add Visio template and stencil files to the project.
- Customize the installer by adding Visio-specific actions (the most challenging part, which this post focuses on, as the other steps are relatively straightforward and well-covered in the user manual and numerous tutorials).
So, what does the Solution Publishing Tool actually do with the installer? It fills in the "PublishComponent" Windows Installer table and triggers Visio to rebuild the template cache by modifying the ConfigChangeID registry key. You can find more information about the table in this Microsoft KB832029 and this article. Since the Visual Studio installation project is a limited tool and does not support component publishing, this gap was filled by the Solution Publishing Tool.
WiX does not impose any restrictions and provides full access to all features Windows Installer supports. This means you can author these Visio publishing rules directly in the installer without the need for the Solution Publishing Tool, allowing your project to be built in Visual Studio or from the command line, including Azure DevOps, which supports WiX builds.
Adding Visio publishing information to the WiX installer
After adding a Visio template/stencil file, your WiX project will contain something like this:
<Component Id="StencilA">
  <File Name="StencilA.vss" />
</Component>
To publish the stencil to Visio, you need to add publishing information like this:
<Component Id="StencilA">
  <File Name="StencilA.vss" />
  <Category
    Id="{CF1F488D-8D6F-499C-A78D-026E1DF38101}"
    Qualifier="1033\StencilA.vss"
    AppData="X Stencils\Stencil-A" />
</Component>
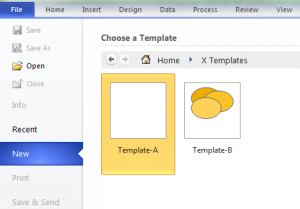
The example above publishes an English stencil (ID = GUID of stencil), named "StencilA.vss", which should be made available under the category "X Stencils" as "Stencil-A". The field values for Visio are as follows (refer to the above KB article):
| Attribute | Value | Example |
|---|---|---|
| Id | Fixed code | For templates: {CF1F488D-8D6F-499C-A78D-026E1DF38100} For stencils: {CF1F488D-8D6F-499C-A78D-026E1DF38101} |
| Qualifier | LocaleID\FileName | 1033\flowchart.vst. Note: You cannot use multiples of the same file name in one Visio environment. Locale-ID\FileName must be unique so that Visio can recognize it. Therefore, use a unique file name in one Visio environment. |
| AppData | MenuPath|AltNames | Flowchart\Work Flow Diagram Shapes|Work Flow Diagram Shapes.vss;workflow.vss |
Further description of values:
| Value | Description | Example |
|---|---|---|
| ComponentID | A predefined value for the content type. For templates: {CF1F488D-8D6F-499C-A78D-026E1DF38100}. For stencils: {CF1F488D-8D6F-499C-A78D-026E1DF38101} | |
| LocaleID | The decimal locale ID of the component. Common values include: 1033 (English), 1031 (German), 1036 (French), 1049 (Russian) | 1033 |
| FileName | The file name (without the path) of the template or stencil | flowchart.vst |
| MenuPath | For templates, specifies where the template is displayed in the menus. For stencils, specifies where the stencil is displayed. An empty string means it won’t appear. If an underscore (_) precedes any name, it won’t show in menus. The final portion affects the Visio UI file name. | Flowchart\Work Flow Diagram Shapes. |
| AltNames | A semicolon-delimited list of alternate names. Overrides stored alternate names by the AlternateNames property of the Document object. | Work Flow Diagram Shapes.vss;workflow.vss |
Triggering Visio rebuild template cache
To inform Visio that new stencils/templates were installed, trigger a cache update by modifying the registry value ConfigChangeID under this key:
HKEY_LOCAL_MACHINE\Software\Microsoft\Office\Visio.
The Visio Solution Publishing tool accomplishes this by embedding a small script to increase the ID by one:
Action "VisSolPublish_BumpVisioChangeId32"
Dim WshShell, visChangeId
Set WshShell = CreateObject("WScript.Shell")
Key = "HKLM\Software\Microsoft\Office\Visio\ConfigChangeID"
On Error Resume Next
visChangeId = WshShell.RegRead()
If Err = 0 Then WshShell.RegWrite Key, visChangeId + 1, "REG_DWORD"
With WiX, you can implement this in several ways:
- Use the same method as the Solution Publishing tool by adding the following code to your installer:
<!-- define script action to increment Visio counter -->
<CustomAction
  Id="SetConfigChangeID"
  Script="vbscript"
  Execute="deferred"
  Impersonate="no"
  Return="check" >
<![CDATA[
    Set WshShell = CreateObject("WScript.Shell")
    Key = "HKLM\Software\Microsoft\Office\Visio\ConfigChangeID"
    On Error Resume Next
    visChangeId = WshShell.RegRead(key)
    If Err = 0 Then WshShell.RegWrite key, visChangeId+1, "REG_DWORD"
]]>
</CustomAction>

<!-- execute script action on install -->
<InstallExecuteSequence>
  <Custom Action="SetConfigChangeID" After="InstallInitialize" />
</InstallExecuteSequence>
- Implement a custom action that does not involve scripting (see the sample solution for implementation details).
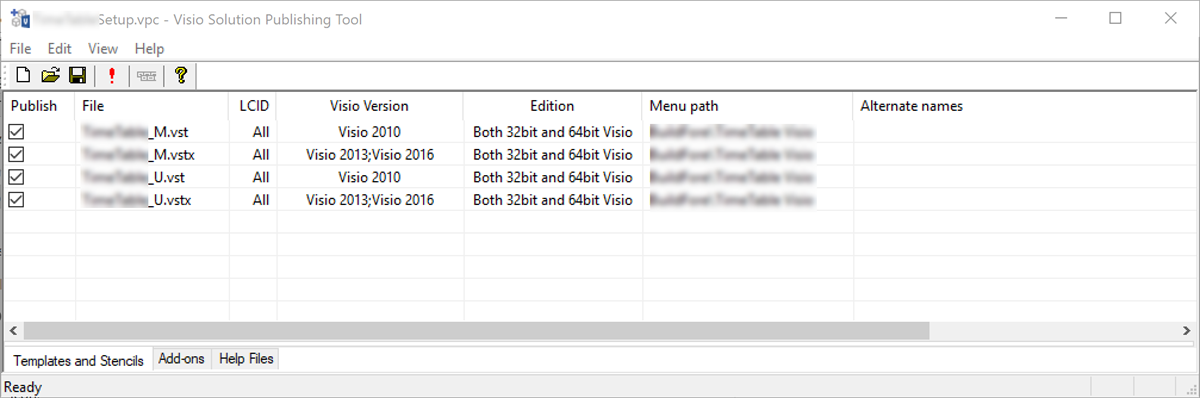
Two sample solutions have been attached for reference (templates) to build your installer. The first uses the VBScript approach (to bump ConfigChangeID with VBScript), while the second implements a custom action. The setup deploys 2 templates and 2 stencils.
https://unmanagedvisio.com/download/source/WixSolutionSetup.zip
https://unmanagedvisio.com/download/source/WixSolutionSetup_SC_Script.zip
The solutions should build an installer (x86 or x64 version depending on the selected configuration) to install templates and stencils in English and German under categories "X Stencils" and "X Templates". It should work with all Visio versions (2003 – 2013).