
If you want to create a Visio add-in, there are several options available. You can go with plain COM addin, VSTO (Visual Studio Tools for Office) addin, or with a VSL. This project template provides an improved starting point to build managed Visio addins with Visual studio (including free Visual Studio Community Edition).
Link to download from Visual Studio Gallery
What the addin project provides to help you get started
– The basic addin project, based on VSTO or COM.
- Installer project, which is fully customizable (based on WIX) where you can select to install additional Visio files such as stencils or templates. Or additional DLLs. Or PDFs. Or whatever. The installer can publish your stencils and templates to Visio, so that they are available as built-in templates. You just specify the files, the wizard takes care of the rest. If you want to customize names/folders/versions you can still do so afterwards by modifying it in the generated project.
- User Interface to start with (ribbon xml/command bars)
- A TaskPane framework (not really a "TaskPane" in case of Visio , but something like it – a docking panel), and a toggle button to control it
- Custom images support code for the buttons. You can change them, or design your own based on the example.
- State support (enabled/visible) for the buttons
- Optional support for legacy Visio support (2003/2007) with command bar buttons
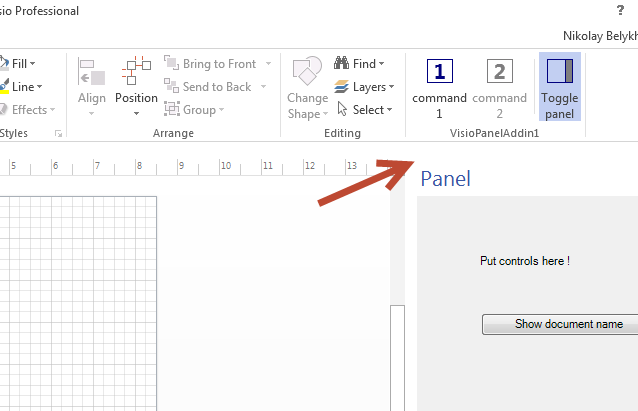
Sample result in Visio of what you get (checkboxes in the wizard set to allow "panel" and "ribbon" features):
![]()
Source code of the extension is availble at the github (you may be interested in that if you build Visual Studio project templates, or build WIX extensions. The project includes a full-blown extension, that includes compiler with custom tables, binder extension, and also decompiler extnesion): https://github.com/nbelyh/VisioPanelAddinVSTO
Getting started
- In Visual Studio, go to:
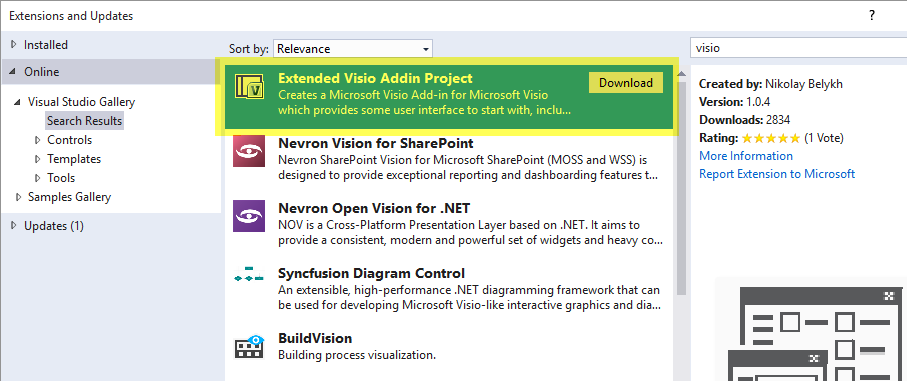
Tools -> Extensions and updates -> Online -> Search for the project -> Install
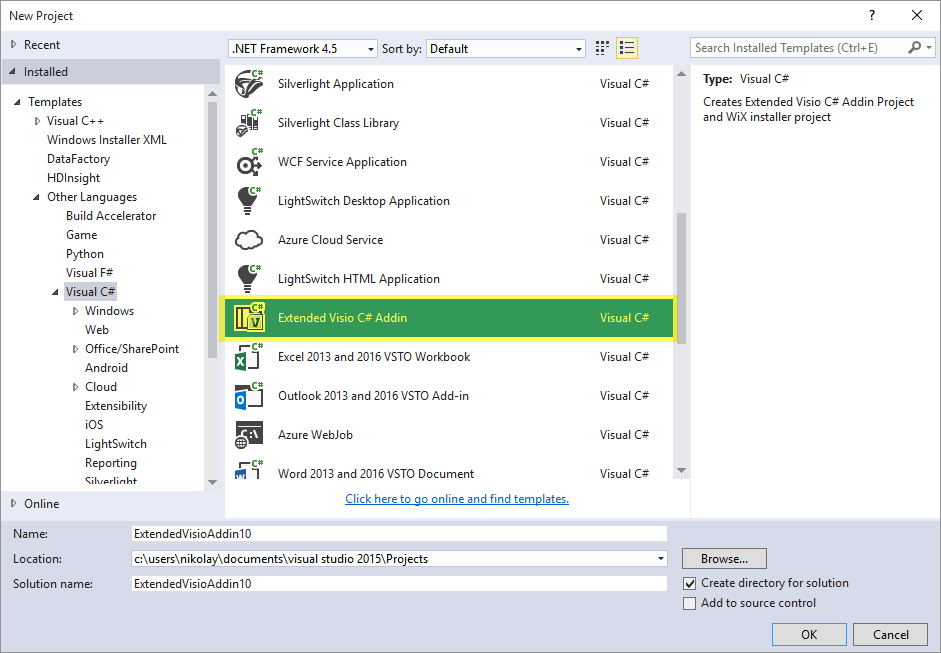
- Use New project -> Select the project type (under C# tab, or C++ tab)
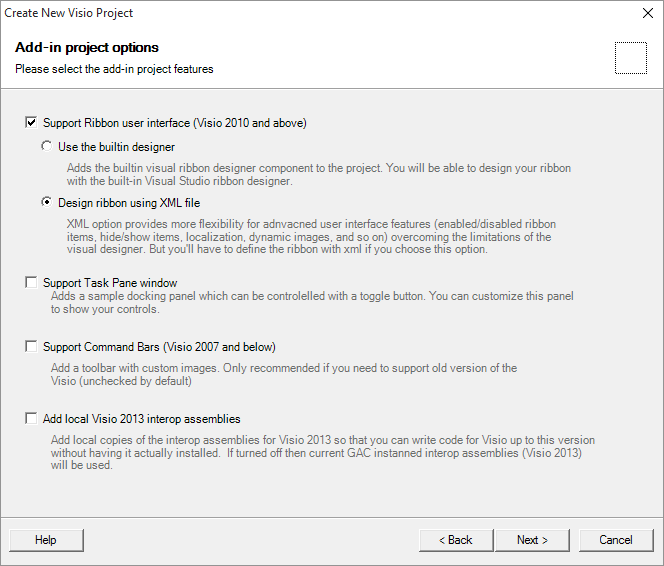
3. The project wizard opens. See options below.
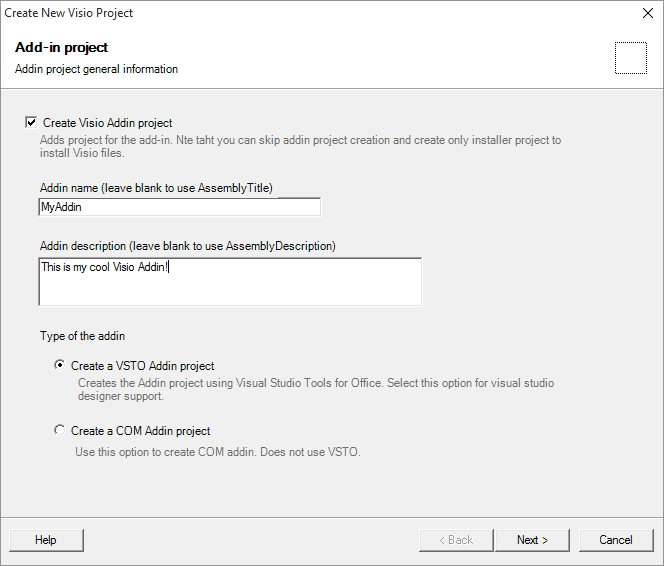
Create Visio Addin
You must check this if you want to create a Visio addin project. Note that if you deselect this option, then you still will be able to proceed. This may be what you want in case you want to create an installer to install (publish) just some Visio files (such as stencils or templates). The wizard will let you select those on the next steps.
Addin Name
Specify the name of the Add-in to be shown in Visio User Interface.
Addin Manufacturer
The name of the publisher to show in install/uninstall. Note that to show publisher name in Visio, you need a certificate to sign the addin (this "manufacturer" field will not work for this purpose)
Addin Description
The description of the addin to be shown in Visio User Interface.
Addin Type
The type of the addin to create. In most cases, the VSTO addin is recommended. If you are in doubt, just select it. You may want COM (in Visual Studio that’s called "Shared Addin") if you migrate your old code, or if you want to support something like Visio 2013.
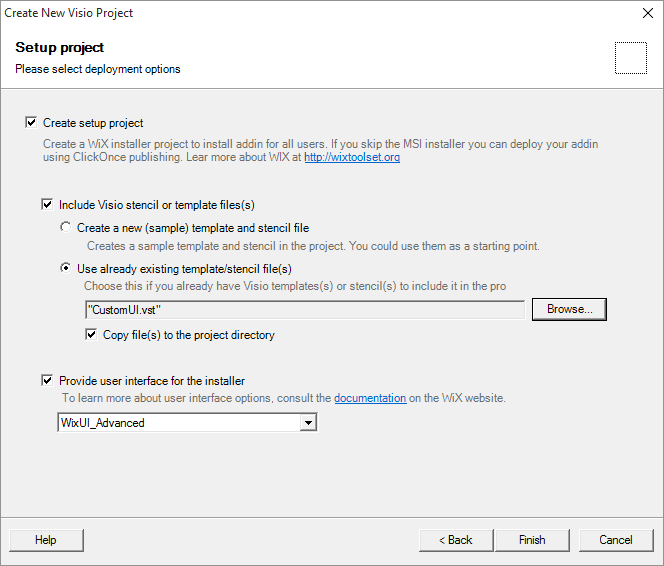
Create setup project
Check if you want a WIX installer project to install your addin. The addin setup project provides you with some neat features which are not available otherwise. But anyways, you for VSTO addin you can use ClickOnce publishing instead (available via Visual Studio addin project settings)
Include Visio Stencils and Templates
The visio files to be deployed along with the addin. These files are published (this option works identical to Visio solution publishing). By default, the stencils/templates are published for all Visio versions, for all languages. You can fine-tune your stensil/templates afterwards by changing attributes of the corresponding <Publish> element. You can also add stencils/templates afterwards, i.e. this is a convenience feature.
Copy files to project directory
If checked, the selected files will be copied to the project directory, and these (copied) files will be included in the setup. If you uncheck this flag, then original source files will be picked up by setup, but please mind the file paths then (you may end up with absolute paths – modify them in the generated project as needed)
Provide user interface for the installer
If checked (default), the installer will include some (selected) user interface. If you uncheck this, the installer will not include any UI. For the details on UI, please refer to wix UI interface options.
User interface language
You can specify the language of the installer (should be one of the supported languages). Note that if your installer includes files with non-english symbuls, you should select the language where these symbols are valid. Like, select "ru-RU" if you have files with cyrilic symbols.
- Build an run
Debugging notes
For VSTO project type, just hit F5, the debugging should start automatically.
For COM project type, first build the solution and install the project. To ease debugging, the default project has "Register for COM interop" option set in debug configuration (this will register the addin automatically at project location instead of installed location after you build it). Note that you’ll need to start Visual Studio as Administrator for this to work. Also note that by default latest Visio is selected for debugging (if you have more than one Visio versions installed). You can change that in the project settings.
Project structure
The start-up project consists of a few classes. Some of them are generated or note depending on the checkboxes set on project creation.
ThisAddin – (always generated) is supposed to contains startup functionality of the addin, and the code.
AddinRibbon – generated if ribbon support was selected; defines infrastructure needed to support the ribbon.
AddinCommandBars – generated to support Command Bars UI (for old versions of Visio), if selected.
PanelFrame, PanelManager – (if you have selected to include task pane) – helper classes to support task pane integration.
TheForm – The form to be shown in the task pane. This is the class to define your user interface for the task pane.
Adding new commands
If you have selected to use ribbon designer, just add a button to the ribbon using the designer. To create handler, double click it.. Simple as that.
To add a new command/edit existing command with XML
Ribbon interface: Edit the Ribbon.xml file and add buttons/controls. Note many callback functions for the buttons/controls are already defined in the AddinRibbon file. These include:
– OnGetRibbonLabel
– OnRibbonButtonClick
– IsRibbonCommandEnabled
– GetRibbonImage
To add a button, you can just add it in the Ribbon.xml like this:
<button id="CommandX"
getLabel="OnGetRibbonLabel"
onAction="OnRibbonButtonClick"
getEnabled="IsRibbonCommandEnabled"
getImage="GetRibbonImage" />
You can just modify the Addin.cs file OnCommand/IsCommandEnabled/IsCommandChecked to process the command. Note that there is no need to define all handlers; you can keep only the ones you need (if you don’t need dynamic images or dynamic text, don’t add OnGetRibbonLabel/GetRibbonImage). The processing is done in the Addin.cs to have common place for ribbon/command bars, to support also old versions of Visio.
Command bars interface: Add the new command ids (string) it to initialization list of StartupCommandBars() function. Process them in the Addin.cs OnCommand/GetRibbonImage/etc.
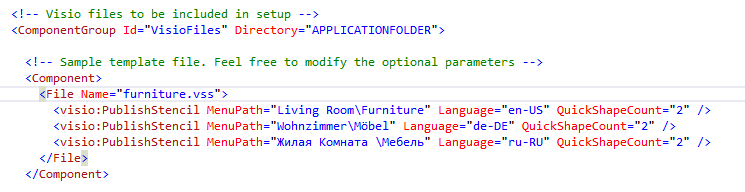
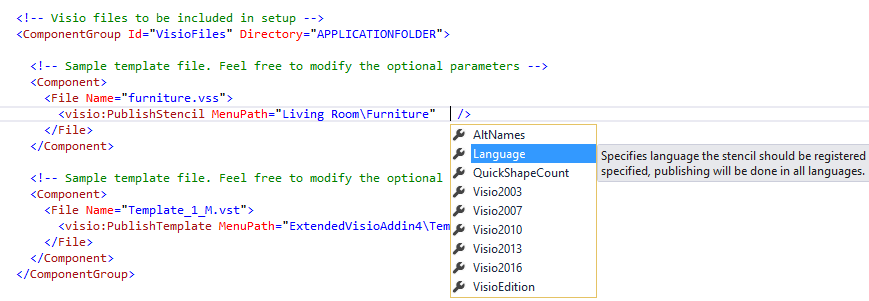
Configuring templates/stencils
You can configure templates/stencils after adding them, to specify names/locations where they should be made available in Visio user interface. You have autocomplete in the project to help you with this. For example, to publish the same stencil under different names depending on Visio language, you can do (note that this is artificial example, normally you should create 3 stencils, and publish them with corresponding languages). Also this will move first 2 shapes as "Quick Shapes".
Adding other files to the setup (like related DLLs)
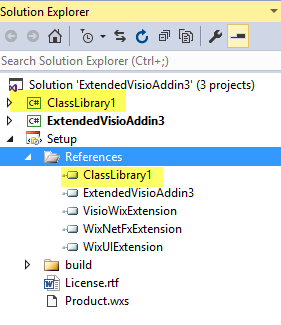
This example address the case when you in addition to the addin dll, have other dll project you want to include in the (WIX) setup. The best way to do this is to use project reference.
Basically, you need to add a reference to the dll project to the wix (setup) project:
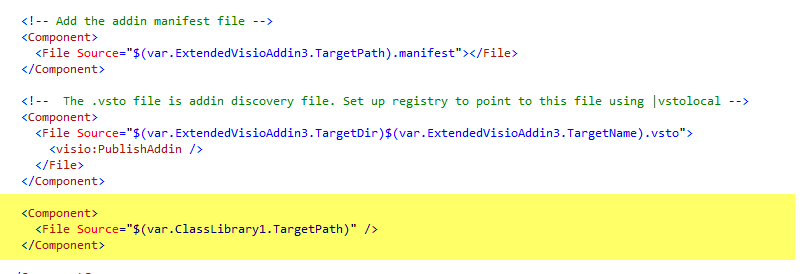
and the add the output of the project to be installed in the wxs file, like this:
Hi. Thanks for putting this together. I have been using the VB .net VTSO version for a while now and it’s been great. I have just encountered a problem though on a mew machine with .Net Framework 4.6.x installed. Visual Studio upgrades the project as I don’t have .Net Framework 4 and from then on I can’t build the solution without errors that I can’t resolve. Do you know whether your template supports .Net Framework 4.6.x or above?
Cheers
Hi! Will check on a clean machine and come back tomorrow – probably it does not make any sense to have it for 4.0 in Visual Studio 2017 🙂
That would be awesome. I am completely stumped, but then again I am a wannabe developer (now). I can’t want, thanks so much!!!!!!!!!
Which version of Visual Studio you are using? Do I understand correctly that it is 2017, but which edition?
hmmmm. So sorry this was user error. I was going to simple run away and hide ashamed, however I thought I better reply 🙂
I spent hours last night trying to get a new clean solution working and all the time I must have been crazy because now I test it I can build a new clean solution without any problems.
FYI I am running VS 2017 Version 15.4.1
My original problem and the reason I am having to create a whole new solution and copy my code across is that when I was forced to upgrade the solution to .Net framework 4.7 I get something I assume are referencing errors that I can’t resolve. I have attached a screenshot of the errors I get. I am unsure why I get these errors on an existing project but a new project from scratch works. Hence my solution was to copy all the code across……..would love your thoughts 🙂
https://www.dropbox.com/s/rmrqs4bi1tg7bqi/Compile_Errors.PNG?dl=0
Hi, I am back.
Just discovered that it was the C# version of the extended addin that has no problems with the .Net framework. The VB version errors with .Net 4.7. Have you noticed this at all?
Cheers
Justin
Dear Justin, looking into that (VB project has issues). Have created an issue on github:
https://github.com/nbelyh/VisioPanelAddinVSTO/issues/2
Brilliant, thanks a lot:)
Fixed in version 1.1.1
https://github.com/nbelyh/VisioPanelAddinVSTO/issues/2
https://marketplace.visualstudio.com/items?itemName=NikolayBelyh.ExtendedVisioAddinProject2017
Awesome!!!! Thanks so much mate. Now to migrate my code across.
I really appreciate the help with this. Are you able to share that the solution was to fix this problem?
when i use the VSTO add-in with Visio 2016 and Visual Studio 2017 it works directly, with the COM add-in option I can build a dll but when I try to add the COM add-in to Visio is tells me it’s not a valid Office add-in?
How do I make the COM add-in option work with Visio or did i miss some steps?
Thanks!
Dear Michael,
Sorry for the delays with replay.
You need to install COM add-in to make it work 🙂 This will register the add-in for Visio.
First, please make sure you have the checkbox for the installer checked, then build the solution, then install. “Add” works only native addins, as far as I know (it does not work for .NET-based addins).
So here are the steps:
1. Create new project, all by default (i.e. include “setup”), for the “COM addin”
2. Build the solution
3. INSTALL the addin. Go to the installer’s bin folder, and run it.
4. (to debug) Re-build the solution. And start debugging (F5)
Hi, just curious to know if this is still relevant. I’m looking at creating a visio add-in and the options seem to be vsto or office add-in using js. Any advice?
Hi Jay!
Yes, it is still more or less relevant. For Visual Studio 2017 and 2019 there is an updated version, here
JavaScript add-ins still do not exist for Visio
thanks for the quick reply and link. Went in circles trying to find info on the ms docs. I misread the js add-in api docs, that’s for embedding a visio drawing in sharepoint.
Correct, that API is for embedding Visio Online diagram in a SharePoint (or another) app (SPFx app for example).
But Visio Online itself does not support any extensions (and even custom shapes) for now.
I want to start with developing vsto for visio and tried your template with visual studio 2022 but the vsto selection is greyed out and the link (dev.office.com) is no longer working…
i have the dotNetFx40_Full_setup and the vstor_redist are already installed! Cant find any VSTO Tools to install, could you help me ?
sorry for double post…
Hi Hans,
There is an updated version for VS 2022
Did you try that one?
https://marketplace.visualstudio.com/items?itemName=NikolayBelyh.ExtendedVisioAddinProject2017